What are size classes ?
Apple is always trying to make developers life easy, every year they introduce something new which let developer achieve their application goals in much easier way. Size classes is solution to developer's question - How can i easily create a view, which will render the way i expect irrespective of type of screen size, type of device & type of orientation ?
Enabling size class
If you create new project in Xcode 6.0 & above, size class is by default enabled, to use size classes, enabling auto layout is must.
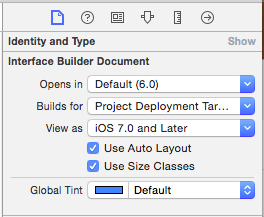
To enable size classes, select xib or storyboard file. In the Utilities select "File Inspector", check both options "Use auto Layout" & "Use Size Classes".
Possible Combinations
If you want to perform any device type or orientation specific changes for view, following are possible combinations.
Default
For all devices & orientation.
C0 : Any, Any
If nothing specific done in following combinations (C1-C4), then by default view follows default setup C0.
iPad
C1 : Portrait - Regular, Regular
C2 : Landscape - Regular, Regular
iPhone
C3 : Portrait - Compact, Regular
C4 : Landscape - Compact, Compact ( Except 6+, for 6+ it is Regular, Compact)
Option 2 : Subview hiding
Rule is simple !!!
Want to do something specific in one of the combination ?
Select your view on interface builder change size class to your required combination from C1- C4. Use option from Opt1-Opt4 to customise view for selected combination.
By default view follows C0 customisation if no customisation is done in combination from C1-C4.
Options available for customisation
What all options provided by apple to perform something specific in one of the Combination C0-C4 ?
Option 1 : Font
Setting different font for different combination.
Setting different font for different combination.
Option 2 : Subview hiding
Not showing some view in some combination.
Option 3 : Constraint
Setting different constraints for each combination.
Option 4 : Xcassets
Using different assets for different combination.
Option 4 : Xcassets
Using different assets for different combination.
How to achieve it ?
Rule is simple !!!
Want to do something specific in one of the combination ?
Select your view on interface builder change size class to your required combination from C1- C4. Use option from Opt1-Opt4 to customise view for selected combination.
By default view follows C0 customisation if no customisation is done in combination from C1-C4.
How to change size class ?
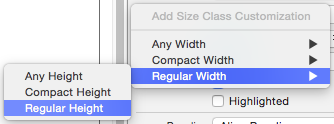
By default Any Any size is set, to change it click on text "wAny hAny".

This is how popover appears on click, drag mouse around, when title highlights your required combination click it.


Creating demo applications using options 1 to 4.
Option 1 : Font size demonstration
Goal
Use one UILabel which will have different font size on iPhone ( System 15 ) & iPad ( System 40 )
Steps
0. Create universal single view application.
1. Go to storyboard, add one label to view, keep it to top left ( use leading & top constraint ) with size around 150x50.
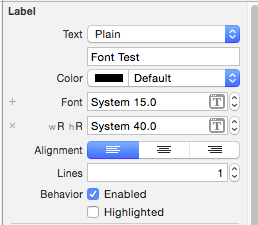
2. Set system font 15, set text "Font Test"
This is how your storyboard view will look like..

3. Now hit "+" sign highlighted in red rectangle in above screenshot
As we want something specific to iPad we will choose combination C1/C2 i.e Regular Width, Regular Height.
Set font 40 for this combination.
4. Run application on iPhone & iPad you will see different font size for respective device type.
Option 2 : Subview hiding
Goal
Use device specific view. ( View used for iPhone should not be visible on iPad & vice versa)
Steps
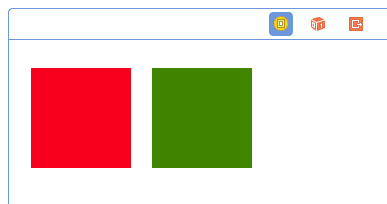
We will use two UIView with red & green background colour.
Red view for iPhone & Green for iPad
0. Create universal single view application.
1. Go to storyboard, add two view one with red background colour & other with green, keep it to top left ( use leading, top, height, width constraint ) with size around 100x100.
This is how it should look after setup..
2. Now select Red view, go to attribute inspector, hit "+" sign highlighted in red rectangle
As we want something specific to iPad we will choose combination C1/C2 i.e Regular Width, Regular Height
This will install same view for Regular x Regular combination
Perform same for Green view.

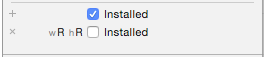
3. Lets hide Red view for Regular x Regular combination ( iPad ), to do this uncheck installed view for wR hR combination. It should look like this
Now do exact opposite for Green view. It should look like this
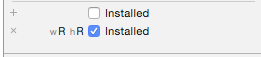
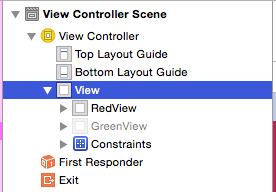
The moment you do this Green view will disappear, on left side you will see your Green view greyed out / disabled.
4. Run application on iPhone & iPad, Red view will be only visible on iPhones & Green will be only visible on iPads.
How can i make changes to green view as it is not visible ?
For this you will have to change your size class to wRegular hRegular from your current mode (which is wAny hAny) from bottom of storyboard. To make changes to Red view switch back to wAny hAny.
Other solution is install views for all combinations, make changes & before running install / uninstall views.
Option 3 : Constraints
Goal
Create iPhone application with image view & comment view.
Portrait mode : Image view at top & comment view at bottom.
Landscape mode : Image view at left & comment view to right.
See gif from step 5 for understanding goal.
Steps
0. Create iPhone single view application.
1. Go to storyboard, add two views one UIImageView & other simple UIView as comment view.
2. Setup image view at top with some image set to it, set comment view at bottom with some background colour.
3. Setting constraints
For image view set leading constraint with constant value 0. Now select constraint go to attribute inspector, hit "+" sign highlighted in red rectangle, select compact width & compact height.
This is how it should look after..

Now refer following table to add rest of constraints with installed check / uncheck for respective Combination.
Note - Give proper name to constraints for better readability.

4. This is how your view constraint should look, once you are done with constraint setup
Storyboard mode - wAny hAny

Storyboard mode - wCompact hCompact

5. This is how your app with orientation will look like
Option 4 : Using different assets for Combinations C0-C4.
Steps
1. Go to Images.xcassets
2. Select any image set
3. Open Attributes inspector
4. Change width & height to specific combination C0-C4, this will add more image placeholder other than 1x, 2x, 3x.
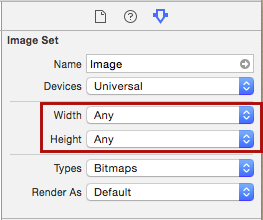
5. Add images to placeholder for respective combination.
No comments:
Post a Comment